Hash Brown Breakfast Cups
Hash Brown Breakfast Cups are individual baked muffin-tin cups made with crispy shredded hash brown nests filled with a set egg and cheese mixture. This recipe makes 12 cups, delivers golden, crunchy edges with a tender, savory egg center, and is perfect for weekend brunch or weekday make-ahead breakfast.
I’ve made these Hash Brown Breakfast Cups at least a dozen times, and the single thing that tripped me up early on was not squeezing the hash browns dry enough — skip that step and the nests turn soggy instead of crisp. Takes an extra 60 seconds. Worth every one of them.
These breakfast cups are the kind of grab-first, gone-fast recipe that makes hosting feel way easier than it should. If this one’s already tempting you, don’t miss more crowd-pleasing breakfast recipes.
Table of Contents
Why You’ll Love These Hash Brown Breakfast Cups
You get two textures in one bite — crunchy, buttery hash brown shell and soft, cheesy egg filling. It’s the kind of thing that sounds impressive but comes together with mostly pantry staples and a muffin tin.
They’re portable, portion-controlled, and work just as well reheated on a Tuesday morning as they do fresh from the oven on Sunday. And because you can customize each cup individually, picky eaters are never a problem.
What Ingredients Do You Need for Hash Brown Breakfast Cups?
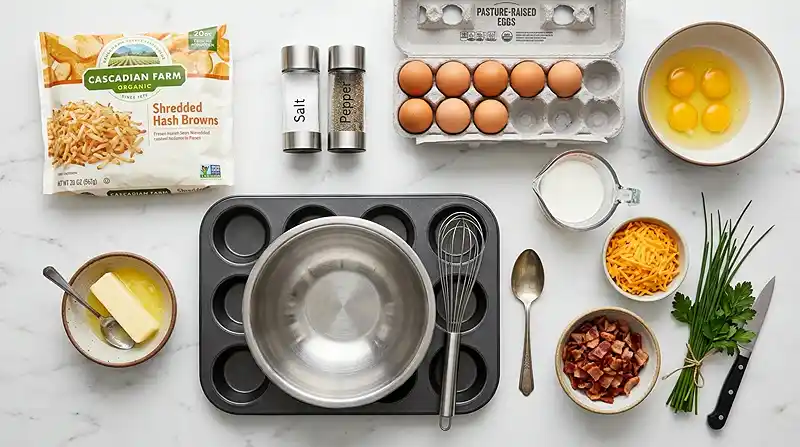
| Ingredient Group | Ingredient | Amount | Notes |
|---|---|---|---|
| Hash Brown Base | Frozen shredded hash browns | 12 oz | Thawed and squeezed dry |
| Hash Brown Base | Melted butter | 4 tbsp | Binds and crisps the shell |
| Hash Brown Base | Salt | 1/2 tsp | Season the base |
| Hash Brown Base | Black pepper | 1/4 tsp | Season the base |
| Egg Filling | Large eggs | 6 | Room temperature preferred |
| Egg Filling | Milk | 1/4 cup | Lightens the egg mixture |
| Egg Filling | Shredded cheddar cheese | 1/4 cup | Melts over the top |
| Optional Add-ins | Chopped cooked bacon or ham | 2 tbsp | Stir into egg mixture |
| Garnish (Optional) | Fresh chives or parsley | To taste | Add after baking |
The frozen hash browns are the foundation of these easy breakfast recipes — just make sure they’re fully thawed and squeezed as dry as you can get them before mixing in the butter. Excess moisture is what kills the crunch.
Cheddar is the classic here, but these hash brown egg nests work beautifully with pepper jack, gruyère, or whatever hard cheese you have open. The bacon or ham is optional but adds a savory depth that makes the cups feel more complete.
How to Make Hash Brown Breakfast Cups Step by Step

Prepare and Pre-Bake the Hash Brown Nests
- Preheat the oven to 375°F (190°C) and lightly grease a 12-cup muffin tin.
- In a medium bowl, combine the thawed and dried hash browns, melted butter, salt, and pepper. Mix well.
- Press about 2 tablespoons of the hash brown mixture into each muffin cup, forming a nest shape with a hollow center and sides that extend up the edges.
- Bake for 15–18 minutes, or until the hash browns are golden brown and crispy.
Pro Tip: Press the hash brown mixture firmly against the sides and bottom of each cup — a loose nest won’t hold its shape when you add the egg filling.
Add the Egg Filling
- While the hash browns bake, whisk together the eggs and milk in a separate bowl until fully combined.
- Remove the muffin tin from the oven and carefully pour the egg mixture into each hash brown cup, filling about two-thirds full.
- Sprinkle shredded cheddar cheese over the top of each cup, then add chopped bacon or ham if using.
Pro Tip: Don’t fill the egg mixture to the rim — eggs puff as they bake and will overflow if overfilled. Two-thirds is the right level every time.
Bake and Serve
- Return the muffin tin to the oven and bake for another 12–15 minutes, or until the eggs are fully set and cooked through.
- Let the cups cool slightly in the muffin tin before carefully removing them.
- Garnish with fresh chives or parsley if desired and serve warm.
Pro Tip: Run a thin silicone spatula or butter knife around the edge of each cup before lifting — even well-greased tins can grip the crispy base.

Expert Tips for Perfect Hash Brown Breakfast Cups
Pro Tips for Success
The key to crispy nests is removing as much moisture as possible from the hash browns. After thawing, wrap them in a clean kitchen towel and squeeze hard — you’ll be surprised how much water comes out. I skipped this step twice and ended up with pale, soft cups both times.
For best results, use a metal muffin tin rather than silicone. Metal conducts heat more efficiently, which means better browning on the bottom and sides of the hash brown shell. Silicone is easier to release but produces noticeably less crisp results.
The most common mistake is underbaking the hash brown shells — instead, wait for a deep golden color before adding the egg mixture. A pale shell means moisture is still present, and that moisture will steam the eggs rather than let them bake cleanly. Golden brown is the cue.
These make-ahead breakfast cups work best when the egg mixture is whisked until fully uniform. Streaky egg whites that aren’t fully incorporated can create uneven texture across the cups. Thirty seconds of solid whisking makes the difference.
Here’s the thing nobody mentions about breakfast egg muffins — they’re even better the next day once the flavors have settled. Fresh out of the oven is great. But reheated on day two? Honestly just as good.
Delicious Variations
Vegetarian Version: Skip the bacon or ham and fold in finely diced bell pepper, spinach, or sun-dried tomatoes with the egg mixture before pouring into the cups. The extra color makes them look great on a brunch table too.
Dairy-Free Version: Swap the butter for melted coconut oil or a neutral olive oil, use unsweetened oat milk in place of regular milk, and skip the cheddar or use a dairy-free shredded cheese alternative. The shells still crisp up well with oil in place of butter.
Low-Carb Version: These are already relatively low in carbohydrates since the hash brown portion per cup is small. To reduce further, use only egg whites and skip the milk — the cups will be firmer but still hold their shape and taste great.
Troubleshooting Common Problems
Problem: The hash brown nests are soft and pale, not crispy.
Solution: Hash browns were not dried thoroughly enough, or the oven wasn’t fully preheated. Squeeze harder next time and make sure your oven is at a true 375°F before the tin goes in.
Problem: The eggs are rubbery or overcooked.
Solution: The cups baked too long in the second round. Start checking at 12 minutes — the eggs should be just set with no visible liquid jiggling in the center. They’ll continue cooking slightly from residual heat after you pull the tin.
Problem: Cups are sticking to the muffin tin and falling apart when removed.
Solution: The tin wasn’t greased well enough, or the cups were removed too soon. Let them cool for 5 full minutes, then run a thin knife around each cup before lifting. Non-stick spray works better than butter for this recipe.
How to Store and Reheat Hash Brown Breakfast Cups
| Storage Method | Duration | Best Practice |
|---|---|---|
| Room Temperature | Up to 2 hours | Keep covered; eggs are perishable |
| Refrigerator | 4–5 days | Store in airtight container in single layers |
| Freezer | Up to 2 months | Cool completely, wrap individually, freeze flat |
To reheat from the fridge, microwave individual cups for 45–60 seconds — the shell will soften slightly but the cheese will be melty and the egg warm throughout. For a crispier result, place in a 350°F oven for 8–10 minutes directly on the rack.
From frozen, thaw overnight in the fridge and reheat as above, or go straight from frozen at 350°F for 15 minutes. The oven method brings back much more of that original crispy texture than the microwave.
Got leftover cups? Slice them in half and layer inside a cottage cheese bagel breakfast sandwich for a high-protein morning. Or crumble one into a bowl with hot sauce and call it the fastest breakfast scramble you’ve ever made.
FAQs About Hash Brown Breakfast Cups
Can I make Hash Brown Breakfast Cups ahead of time?
Yes — these are genuinely one of the best make-ahead breakfast options in the muffin tin category. Bake the full batch, cool completely, and refrigerate in an airtight container for up to 4–5 days. You can also freeze them individually for up to 2 months. Reheat in the microwave or oven and they’re ready faster than most hot breakfasts.
Do I have to use frozen hash browns, or can I use fresh?
Frozen shredded hash browns work best here because they’re pre-par-cooked, which helps the nests hold their shape and crisp up quickly in the oven. Fresh grated potatoes can work but require more moisture removal and a longer pre-bake time. If using fresh, grate, rinse, and squeeze very thoroughly before using — and expect to add 5–7 extra minutes to the initial bake.
How do I know when the eggs are fully cooked?
The eggs are done when there’s no visible liquid jiggling in the center of any cup. The tops should look matte rather than shiny and wet. A toothpick inserted into the egg center should come out without raw egg clinging to it. If you use a thermometer, the egg filling should reach 160°F internally.
Can I make these without cheese?
Yes, the cheese is optional and the cups will still hold together and taste great without it. The cheddar adds a savory, melty layer and helps visually signal that the cups are done, but it’s not structural. If you’re dairy-free or watching calories, skip it entirely or substitute with a dairy-free shredded option.
What other fillings work well in hash brown egg nests?
Almost anything you’d put in a scrambled egg works here. Diced bell pepper, crumbled sausage, sautéed mushrooms, baby spinach, or diced jalapeño all work well. Keep the add-ins finely chopped and pre-cooked where necessary — raw vegetables with high water content (like zucchini) can release moisture and affect the egg texture.
Make a Batch This Weekend — You’ll Thank Yourself Monday
Honestly, once you make these, you’ll understand why they keep showing up in meal prep roundups everywhere. Twelve portions, one pan, done in under 45 minutes — and your whole week’s breakfast situation is handled.
If you’re into this kind of grab-and-go morning food, check out these ham and cheese egg cups and these meal prep egg white veggie muffins — both are made for the same kind of low-effort, high-reward morning routine.
Save this to Pinterest so it’s there when Sunday meal prep rolls around — seriously. And if you try them, leave a comment below with what fillings you used. I’m always looking for new combos to test.
Hash Brown Breakfast Cups — crispy golden potato nests filled with cheesy baked eggs, made in a muffin tin. The best make-ahead breakfast you haven’t tried yet. Save this recipe!

Hash Brown Breakfast Cups
Equipment
- 12-cup muffin tin
- Mixing bowls
- Whisk
Ingredients
Hash Brown Base
- 12 oz Frozen shredded hash browns Thawed and squeezed dry
- 4 tbsp Melted butter Binds and crisps the shell
- ½ tsp Salt Season the base
- ¼ tsp Black pepper Season the base
Egg Filling
- 6 Large eggs Room temperature preferred
- ¼ cup Milk Lightens the egg mixture
- ¼ cup Shredded cheddar cheese Melts over the top
Optional Add-ins
- 2 tbsp Chopped cooked bacon or ham Stir into egg mixture
Garnish (Optional)
- Fresh chives or parsley Add after baking, to taste
Instructions
- Preheat the oven to 375°F (190°C) and lightly grease a 12-cup muffin tin.
- In a medium bowl, combine the thawed and dried hash browns, melted butter, salt, and pepper. Mix well.
- Press about 2 tablespoons of the hash brown mixture into each muffin cup, forming a nest shape with a hollow center and sides that extend up the edges.
- Bake for 15–18 minutes, or until the hash browns are golden brown and crispy.
- While the hash browns bake, whisk together the eggs and milk in a separate bowl until fully combined.
- Remove the muffin tin from the oven and carefully pour the egg mixture into each hash brown cup, filling about two-thirds full.
- Sprinkle shredded cheddar cheese over the top of each cup, then add chopped bacon or ham if using.
- Return the muffin tin to the oven and bake for another 12–15 minutes, or until the eggs are fully set and cooked through.
- Let the cups cool slightly in the muffin tin before carefully removing them.
- Garnish with fresh chives or parsley if desired and serve warm.