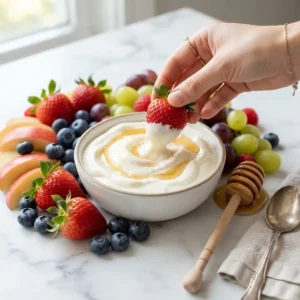
Honey Vanilla Greek Yogurt Fruit Dip
This Honey Vanilla Greek Yogurt Fruit Dip takes three ingredients and five minutes and turns into the thing people ask you to bring to every gathering.
Honey vanilla Greek yogurt fruit dip is a creamy, three-ingredient dip made by whisking together Greek yogurt, honey, and vanilla extract. This recipe serves 4 as a snack, delivers a smooth, tangy-sweet dip with a soft vanilla finish, and is perfect for parties, after-school snacks, or a lazy Sunday fruit platter.
Here’s everything you need to make it perfectly.
I almost didn’t bother writing this one down because it felt too simple to count as a recipe. But then I brought it to a barbecue and three people texted me asking for it the next day, so here we are. The one thing I learned the hard way: whisk it, don’t stir it, or you’ll end up with honey pooled at the bottom.
Table of Contents
Quick Overview
You’ll love this yogurt dip recipe because there’s no cooking, no special equipment, and no ingredient you don’t already have. It’s tangy from the Greek yogurt, sweet from the honey, and rounded out by just enough vanilla to make it taste like dessert instead of a diet snack.
It works for toddlers dipping strawberries and adults dipping it into a wine glass, honestly. And it holds up in the fridge, so you can make it the night before and forget about it.
What Ingredients Do You Need for Honey Vanilla Greek Yogurt Fruit Dip?

| Ingredient Group | Ingredient | Amount | Notes |
|---|---|---|---|
| Main Ingredients | Plain Greek yogurt | 1 cup | — |
| Main Ingredients | Honey | 2 tablespoons | — |
| Main Ingredients | Vanilla extract | 1 teaspoon | — |
That’s it — three ingredients, and every one of them is doing real work. Plain Greek yogurt gives you that thick, tangy base and a solid protein boost, which is what separates this healthy fruit dip from the sugary stuff at the store. Use real vanilla extract if you can; the imitation stuff works in a pinch, but it doesn’t round out the honey the same way.
How to Make Honey Vanilla Greek Yogurt Fruit Dip Step by Step

- In a small bowl, combine the Greek yogurt, honey, and vanilla extract.
💡 Let the honey come to room temperature first — cold honey clumps up and won’t whisk in smoothly.
- Whisk until all ingredients are well combined and smooth.
Pro Tip: Whisking, not stirring, is what keeps the honey from sinking to the bottom of the bowl.
- Serve immediately with your favorite fresh fruits, or cover and refrigerate for at least 30 minutes to allow the flavors to meld.
Pro Tip: This fruit dip with Greek yogurt actually tastes better after the 30-minute chill, since the honey and vanilla have time to settle into the yogurt.

Expert Tips for Perfect Honey Vanilla Greek Yogurt Fruit Dip
Pro Tips for Success
The key to a smooth, lump-free dip is whisking steadily instead of stirring in slow circles — you want air moving through the whole bowl. For best results, use full-fat plain Greek yogurt, since low-fat versions turn out noticeably thinner and less rich.
The most common mistake is skipping the chill time — instead, give it the full 30 minutes so the honey vanilla flavor actually settles in instead of tasting separate. Honey vanilla Greek yogurt fruit dip works best when the honey is fresh and pourable, not crystallized, because crystallized honey never fully smooths out. You’ll know it’s ready when the texture looks glossy and holds a soft peak on the whisk.
Delicious Variations
Quick Version: Skip the fridge time entirely and serve it right after whisking if you’re short on time — it still tastes great, just slightly less blended.
Healthy Version: Use a lower-sugar honey alternative like a light drizzle of maple syrup if you’re watching sugar intake, though the flavor will shift slightly sweeter and less floral.
Dairy-Free: Swap the Greek yogurt for a thick coconut or almond milk yogurt to make this dairy-free, and add an extra half teaspoon of vanilla since dairy-free yogurts tend to taste milder.
Troubleshooting Common Problems
Problem: My dip turned out watery instead of thick. Solution: You probably used a lower-fat or non-Greek yogurt — swap in full-fat plain Greek yogurt, which is naturally strained and thicker.
Problem: There are honey clumps throughout the dip. Solution: Your honey was too cold when you added it — warm it slightly in the microwave for 10 seconds before whisking it in next time.
Problem: The dip tastes flat or one-note. Solution: Add a small pinch of salt, which sounds strange but actually makes both the honey and vanilla taste sharper and more balanced.
How to Store and Reheat Honey Vanilla Greek Yogurt Fruit Dip
| Storage Method | Duration | Best Practice |
|---|---|---|
| Room Temperature | Up to 2 hours | Keep covered and out of direct sun |
| Refrigerator | Up to 5 days | Store in an airtight container |
| Freezer | Not recommended | Yogurt separates and turns grainy when thawed |
This dip is served cold, so there’s no reheating involved — just give it a quick stir if it separates slightly after a few days in the fridge. If you’ve got leftovers, swirl them into oatmeal, spread them on toast under sliced fruit, or use as a base for a quick parfait with granola.
FAQs About Honey Vanilla Greek Yogurt Fruit Dip
What’s the best yogurt to use for this dip?
Plain, full-fat Greek yogurt gives you the thickest and creamiest results. Non-fat or regular (non-Greek) yogurt will work, but the dip will be noticeably thinner and less rich.
Can I use flavored Greek yogurt instead of plain?
You can, but it changes the flavor and sweetness balance, since flavored yogurts already contain added sugar. If you use flavored yogurt, start with less honey and adjust to taste.
How far in advance can I make this dip?
You can make it up to 5 days ahead and store it in the refrigerator in an airtight container. The flavor actually improves after the first hour of chilling.
Can I substitute the honey with something else?
Maple syrup or agave work as substitutes in equal amounts if you don’t have honey on hand. Keep in mind the flavor will shift slightly, since honey has a more floral, distinct taste than either alternative.
Is this fruit dip gluten-free?
Yes, this recipe is naturally gluten-free based on the three ingredients used. Always double-check your specific yogurt and vanilla extract brands if you’re cooking for someone with celiac disease.
Honestly, this is one of those recipes that feels almost too easy to share, but that’s exactly why it’s worth making. Pin it now so you’re not scrambling to remember the ratio the next time someone asks you to bring a snack. And seriously, if you try a variation, tell me about it in the comments — I want to know what you paired it with. If you’re into yogurt-based recipes, you’ll probably also like this Greek yogurt ranch veggie dip, this s’mores Greek yogurt bark, or this high-protein cottage cheese breakfast bowl for another easy, protein-packed option.
Creamy honey vanilla Greek yogurt fruit dip made in 5 minutes with 3 ingredients — sweet, tangy, and perfect for dunking fresh fruit. Pin this for your next gathering.
Harissa Chickpea Chicken Sheet Pan
Equipment
- Large baking sheet
- Parchment paper
- Large bowl
- Small bowl
- Whisk
- Paper towels
Ingredients
Main Ingredients
- 1.5 lbs Boneless, skinless chicken thighs Cut into 1-inch pieces
- 1 15-ounce can Chickpeas Rinsed and drained
- 1 large Bell pepper Any color, chopped
- 1 Red onion Chopped
Harissa Sauce
- 2 tablespoons Olive oil
- 3 tablespoons Harissa paste
- 1 tablespoon Lemon juice
- ½ teaspoon Ground cumin
- ½ teaspoon Smoked paprika
- to taste Salt and black pepper
Garnish
- Fresh parsley Chopped, optional
Instructions
- Preheat the oven to 400°F (200°C). Line a large baking sheet with parchment paper.
- Pat the chicken thighs dry with a paper towel. Add the chicken pieces, drained chickpeas, chopped bell pepper, and chopped red onion to a large bowl.
- In a small bowl, whisk together the olive oil, harissa paste, lemon juice, ground cumin, smoked paprika, salt, and black pepper.
- Pour the harissa mixture over the chicken and vegetables and toss thoroughly until everything is evenly coated.
- Let the chicken and vegetables sit in the harissa mixture for 15 minutes at room temperature to allow the flavors to absorb.
- Spread the mixture in a single layer on the prepared baking sheet. If the pan is overcrowded, divide everything between two baking sheets.
- Roast for 25 to 30 minutes, tossing or flipping the ingredients halfway through cooking for even browning.
- Continue roasting until the chicken reaches an internal temperature of 165°F and the vegetables are tender with lightly charred edges.
- Garnish with chopped fresh parsley, if desired, and serve warm.