No-Bake Lemon Lush Cups
These No-Bake Lemon Lush Cups are a layered dessert with a buttery Golden Oreo crust, tangy cream cheese filling, silky lemon pudding, and a fluffy whipped topping. This recipe serves about 12 individual cups, delivers bright citrus flavor with a creamy, melt-in-your-mouth texture, and is perfect for summer parties, potlucks, and make-ahead entertaining.
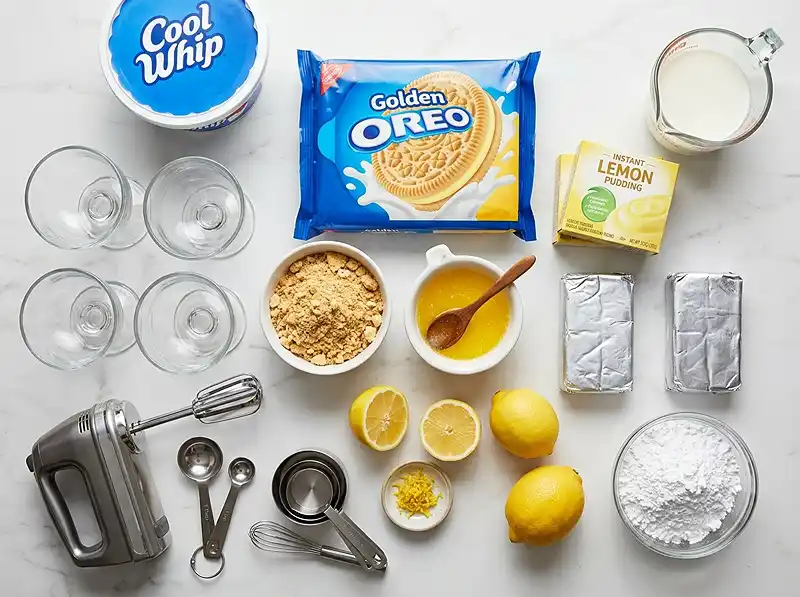
Here’s everything you need to make it perfectly.
I’ve made this recipe more times than I can count for summer cookouts, and the one thing I wish someone had told me upfront: don’t skip the freezer step for the crust. Ten minutes in the freezer is the difference between a crust that holds beautifully and one that crumbles into the cream cheese layer the second you scoop it.
If this one already sounds like a keeper, you’ll want to peek at more light no-bake summer desserts before your next warm-weather craving hits.
Table of Contents
Why You’ll Love These No-Bake Lemon Lush Cups
These cups are cool, creamy, and genuinely refreshing — the kind of warm weather treat that disappears fast at every gathering.
No oven required, which means no heating up the kitchen in summer. The layers set up beautifully in the fridge overnight, making them ideal for make-ahead sweets you can prep the day before a party.
The tangy lemon flavor cuts through the richness of the cream cheese, so each bite feels light even though it’s totally indulgent. They work equally well as easy dessert cups for a backyard BBQ or an elegant dinner party finish.
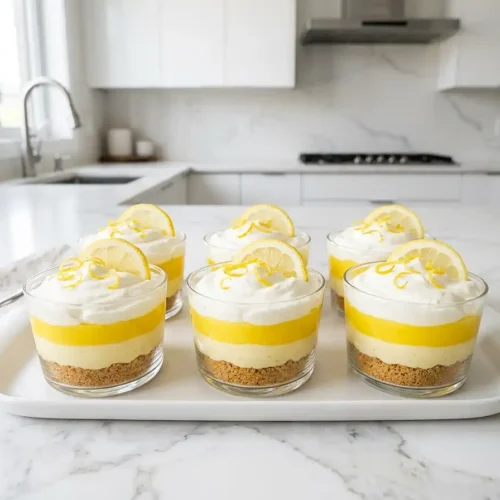
Easy No-Bake Lemon Lush Cups That Wow
Equipment
- Food processor
- Mixing bowls
- Electric mixer
- Whisk
- Measuring Cups
- Individual dessert cups
- Spatula
Ingredients
Crust Layer
- 18-19 oz package Golden Oreo cookies Crushed into fine crumbs
- ½ cup Butter Melted
Cream Cheese Layer
- 2 packages Cream cheese Softened, 8 oz each
- 1 cup Confectioners’ sugar Sifted
- 2 tbsp Fresh lemon juice Or to taste
- 2 tsp Fresh lemon zest Optional
Lemon Pudding Layer
- 2 boxes Instant lemon pudding mix 3.4 oz each, instant only
- 3 cups Cold milk Must be cold
Topping
- 8 oz Cool Whip Thawed
Homemade Whipped Cream Option
- 3 cups Heavy whipping cream Whip to stiff peaks
- 1 tsp Vanilla extract For flavor depth
- ½ cup Powdered sugar Sweetens whipped cream
Garnish
- To taste Lemon zest For garnish
Instructions
- Crush the Golden Oreo cookies into fine crumbs using a food processor or rolling pin. Mix the crumbs with melted butter until evenly coated and resembling wet sand.
- Press the crust mixture firmly into the bottom of each dessert cup. Freeze the cups for 10 minutes to help the crust set.
- Beat the softened cream cheese with confectioners’ sugar and fresh lemon juice until completely smooth and creamy. Fold in a portion of the Cool Whip or homemade whipped cream.
- Spread the cream cheese mixture evenly over the chilled crust layer in each cup.
- Whisk together the instant lemon pudding mix and cold milk for about 2 minutes until thickened.
- Spread the lemon pudding layer evenly over the cream cheese layer in each cup.
- Top each cup with the remaining Cool Whip or homemade whipped cream. Garnish with lemon zest and optional lemon slices.
- Refrigerate the assembled cups for at least 2 to 4 hours or overnight before serving to allow the layers to fully set.
Notes
What Ingredients Do You Need for Lemon Lush Cups?
| Ingredient Group | Ingredient | Amount | Notes |
|---|---|---|---|
| Crust Layer | Golden Oreo cookies (or vanilla cream-filled sandwich cookies), crushed | 18–19 oz package | Crushed into fine crumbs |
| Crust Layer | Butter, melted | 1/2 cup | Binds crumbs together |
| Cream Cheese Layer | Cream cheese, softened | 2 (8 oz) packages | Must be fully softened |
| Cream Cheese Layer | Confectioners’ sugar | 1 cup | Sifted for smooth texture |
| Cream Cheese Layer | Fresh lemon juice | To taste | Start with 2 tablespoons |
| Cream Cheese Layer | Fresh lemon zest (optional) | 2 tsp | Boosts citrus flavor |
| Lemon Pudding Layer | Instant lemon pudding mix | 2 boxes (3.4 oz each) | Instant only, not cook-and-serve |
| Lemon Pudding Layer | Cold milk | 3 cups | Must be cold for thickening |
| Topping | Cool Whip, thawed | 8 oz | Or homemade whipped cream |
| Topping (Homemade Option) | Heavy whipping cream | 3 cups | Whip to stiff peaks |
| Topping (Homemade Option) | Vanilla extract | 1 tsp | For flavor depth |
| Topping (Homemade Option) | Powdered sugar | 1/2 cup | Sweetens whipped cream |
| Garnish | Lemon zest | To taste | Adds color and aroma |
Golden Oreos are the secret weapon in this crust — their vanilla flavor complements the lemon layers far better than a traditional chocolate Oreo would.
For the cream cheese layer, fully softened cream cheese isn’t optional. Cold blocks will leave lumps no amount of beating can fix. Pull it out of the fridge at least an hour ahead.
And if you’re going the homemade whipped cream route instead of Cool Whip? That combo of heavy cream, vanilla, and powdered sugar makes this feel noticeably more like a restaurant-quality no-bake dessert.
How to Make Lemon Lush Cups Step by Step
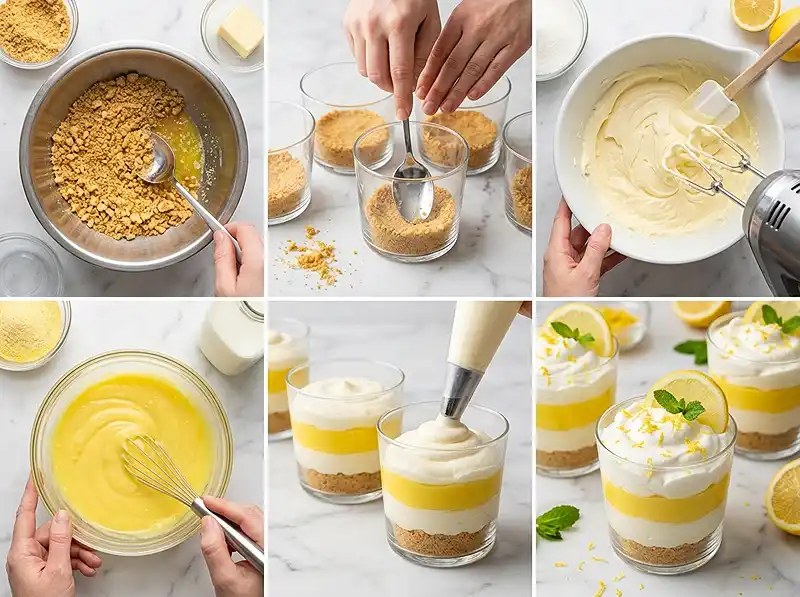
Step 1: Prepare the Crust
- Crush the Golden Oreo cookies into fine crumbs using a food processor or a zip-lock bag and rolling pin.
- Mix the crumbs with the melted butter until the mixture resembles wet sand and every crumb is coated.
- Press a firm, even layer of the crust mixture into the bottom of each individual cup.
- Place the cups in the freezer for 10 minutes to set the crust layer solid before adding toppings.
Pro Tip: The key to a crust that doesn’t fall apart is pressing it firmly with the back of a spoon — you want it compacted, not loose.
Step 2: Make the Cream Cheese Layer
- Beat the softened cream cheese with confectioners’ sugar and fresh lemon juice until completely smooth and creamy with no lumps.
- Fold in a portion of Cool Whip (or homemade whipped cream) gently to lighten the texture of the mixture.
- Spread the cream cheese layer evenly over the chilled crust in each cup.
Pro Tip: For best results, taste the cream cheese mixture before spreading — adjust the lemon juice a little at a time, since the flavor concentrates as it chills.
Step 3: Prepare the Lemon Pudding Layer
- Whisk the instant lemon pudding mix together with the cold milk in a large bowl for about 2 minutes until the mixture thickens.
- Spread the thickened pudding layer evenly over the cream cheese layer in each cup.
Pro Tip: The most common mistake here is using warm or room-temperature milk — instant pudding won’t set properly. Cold milk straight from the fridge is non-negotiable.
Step 4: Add the Topping
- Spread the remaining Cool Whip (or homemade whipped cream) over the top of the pudding layer in each cup.
- Garnish each cup with fresh lemon zest and, if desired, a thin slice of fresh lemon for presentation.
Step 5: Chill
- Refrigerate the assembled cups for at least 2 to 4 hours, or overnight, to allow all the layers to firm up completely before serving.
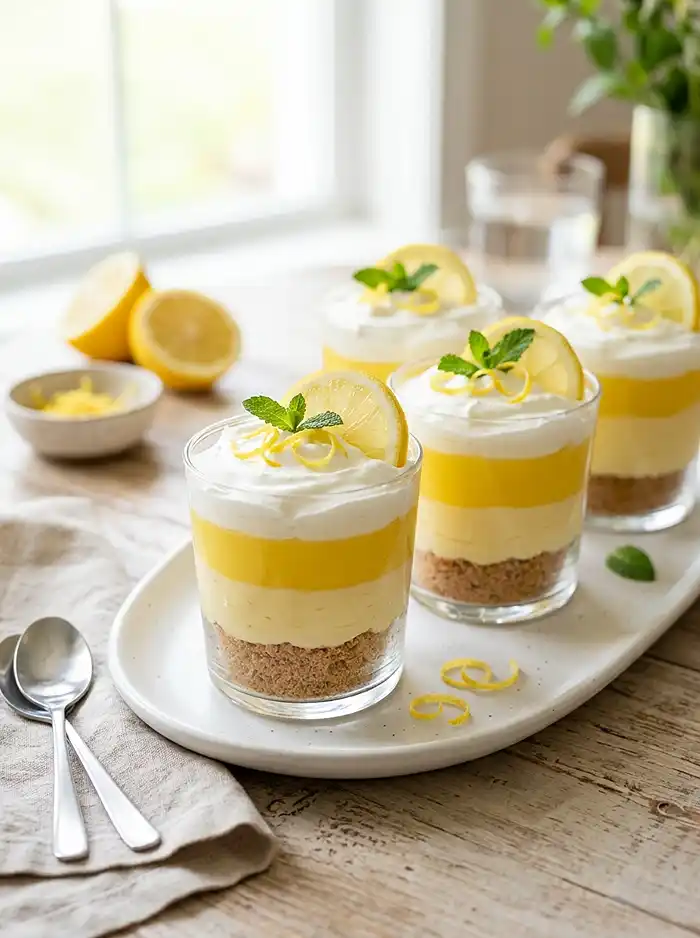
Expert Tips for Perfect No-Bake Lemon Lush Cups
Pro Tips for Success
“The key to clean, defined layers is patience.” Let each layer chill slightly before adding the next if your kitchen is warm. Rushing the assembly in a hot room causes the layers to bleed together.
For best results, make this the night before. The overnight chill gives the cream cheese layer and pudding time to fully set, which makes each cup easier to serve and far more satisfying in texture.
The most common mistake is under-softening the cream cheese — instead, let both packages sit at room temperature for at least 60 minutes, then beat until silky before adding anything else. A cold block of cream cheese will stay lumpy no matter how long you beat it.
No-Bake Lemon Lush Cups work best when the pudding is spread while it’s still just-thickened — not fully stiff. If it sits too long before spreading, it gets rubbery and won’t layer smoothly. Work quickly once it thickens.
Real talk: the lemon zest garnish isn’t just for looks. It adds an aromatic hit of citrus right when you bring the cup to your face that makes the whole dessert taste brighter and more vibrant.
Delicious Variations
Make-Ahead Version: These cups can be fully assembled up to 24 hours in advance and kept covered in the refrigerator. The crust stays crisp and the layers stay beautifully distinct when made the day before a party.
Gluten-Free Version: Swap the Golden Oreos for a gluten-free vanilla sandwich cookie and confirm your pudding mix brand is labeled gluten-free. Every other ingredient in this recipe is naturally gluten-free, so the swap is simple.
Dairy-Free Version: Use a dairy-free cream cheese (like Violife or Kite Hill), a plant-based whipped topping, and your preferred non-dairy milk for the pudding layer. The texture will be slightly softer but the flavor holds up really well.
Troubleshooting Common Problems
Problem: The crust is crumbling when I scoop the cups.
Solution: The crust wasn’t pressed firmly enough, or it didn’t get enough freezer time. Press harder with the back of a spoon and give it a full 10 minutes in the freezer before adding any layers.
Problem: The cream cheese layer has visible lumps.
Solution: The cream cheese wasn’t fully softened before beating. You can try to rescue it by setting the bowl over warm water for a few minutes and beating again, but the safest fix is to start fresh with fully room-temperature cream cheese.
Problem: The pudding layer is too runny.
Solution: The milk wasn’t cold enough, or the pudding wasn’t whisked long enough. Use cold milk straight from the fridge and whisk a full 2 minutes — it should noticeably thicken before you spread it.
How to Store and Reheat No-Bake Lemon Lush Cups
| Storage Method | Duration | Best Practice |
|---|---|---|
| Room Temperature | Up to 2 hours | Keep out of direct sun; return to fridge after serving |
| Refrigerator | Up to 4 days | Cover tightly with plastic wrap or lids to prevent drying |
| Freezer | Up to 1 month | Freeze before garnishing; thaw overnight in refrigerator |
No reheating needed — these are meant to be served cold straight from the fridge. After freezing, thaw in the refrigerator overnight rather than at room temperature to keep the layers from weeping or separating.
Leftover cups with slightly softened crust? Crumble them into a bowl and layer with extra whipped cream for a quick parfait-style treat. You lose the visual layers but none of the flavor.
FAQs About No-Bake Lemon Lush Cups
Can I make No-Bake Lemon Lush Cups in a pan instead of individual cups?
Yes. Use a 9×13 inch baking dish and follow the exact same layering process. Press the crust into the bottom of the dish, then add the cream cheese, pudding, and whipped topping layers in order. Chill for at least 4 hours before slicing and serving.
Can I use homemade whipped cream instead of Cool Whip?
Absolutely. Whip 3 cups of heavy whipping cream with 1 teaspoon vanilla extract and 1/2 cup powdered sugar until stiff peaks form. Use it exactly as you’d use Cool Whip — folded into the cream cheese layer and spread on top. Homemade whipped cream gives a richer, less-sweet flavor.
How far in advance can I make these cups?
You can fully assemble these up to 24 hours before serving. The layers will actually be better defined and firmer after an overnight chill than after just 2 to 4 hours. Add garnishes like lemon zest and lemon slices right before serving so they look fresh.
Can I substitute the lemon pudding mix with another flavor?
Yes. Vanilla or cheesecake-flavored instant pudding both work well if you want a milder flavor. Strawberry pudding with a vanilla Oreo crust is also a popular variation. Keep the same quantity — 2 boxes of 3.4 oz instant pudding mix with 3 cups cold milk — regardless of the flavor you choose.
Why aren’t my pudding layers setting up firmly?
The two most likely causes are warm milk or insufficient whisking time. Instant lemon pudding requires cold milk — ideally just above refrigerator temperature — and about 2 full minutes of active whisking. If the pudding still seems loose after 2 minutes, continue whisking in 30-second intervals. It should be noticeably thicker before you spread it.
Save This Recipe and Let Me Know How It Goes
Honestly, once you make these once, they’ll become your go-to summer dessert. I mean it — they look impressive, they travel well, and they take less than 20 minutes of active work.
Pin this recipe to your dessert board so you can find it easily all season long. And if you make them, drop a comment below — I’d love to hear if you went with Cool Whip or homemade whipped cream. (Genuinely curious which one wins in your house.)
If you love easy no-bake dessert cups, you’ll also want to check out these No-Bake Oreo Cheesecake Bites and these No-Bake Banana Pudding Cups — both are just as easy and just as crowd-pleasing.
And if you’re in a peanut butter mood, these No-Bake Peanut Butter Pie Cups are basically the same format with a completely different flavor profile. Perfect for when you need variety at a party spread.
No-Bake Lemon Lush Cups with a Golden Oreo crust, creamy lemon layers, and fluffy whipped topping — the easiest make-ahead summer dessert you’ll make this season. Save this for your next party!