No-Bake Banana Pudding Cups
These no-bake banana pudding cups are one of the best make-ahead sweets you can bring to any summer gathering — creamy, layered, and ready to impress. Save this recipe and thank yourself later.
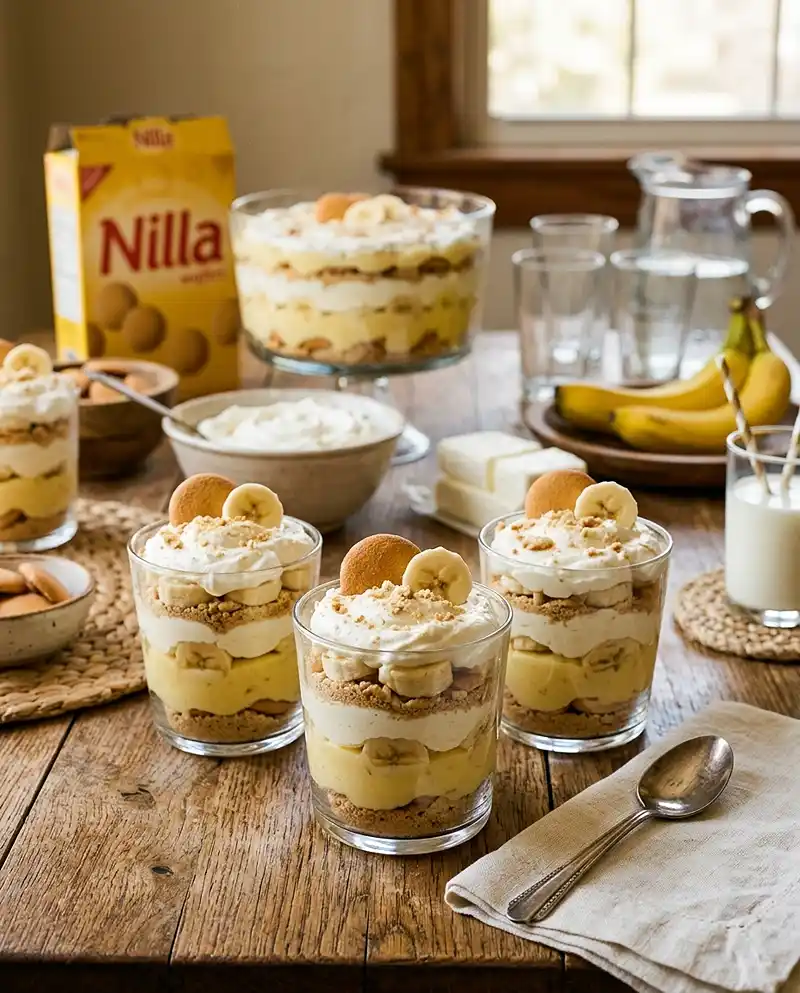
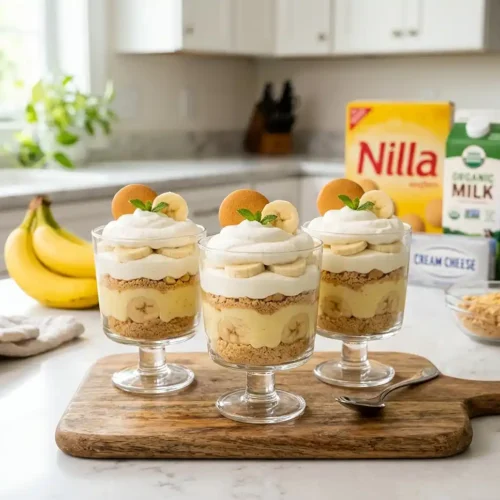
No-Bake Banana Pudding Cups are individual layered desserts built with instant banana pudding, a whipped cream cheese layer, crushed vanilla wafer cookies, and fresh banana slices — all served in 9 oz cups with zero oven time required.
If you’re already craving it, don’t stop here—there are more summer desserts without baking you’ll want lined up before the hottest days hit.
Table of Contents
Why You’ll Love This No-Bake Banana Pudding Cups Recipe
There’s no baking, no oven preheating, and no timing stress — just layering and chilling. The texture contrast is genuinely satisfying: silky pudding, fluffy cream cheese filling, crunchy cookie crumble, and juicy banana in every bite.
It scales beautifully, whether you’re making 20 individual cups for a crowd or one big trifle for the table. And because you can assemble everything except the banana slices up to two hours ahead, it’s one of the most practical easy dessert cups you’ll add to your rotation.
What Ingredients Do You Need for Banana Pudding Cups?
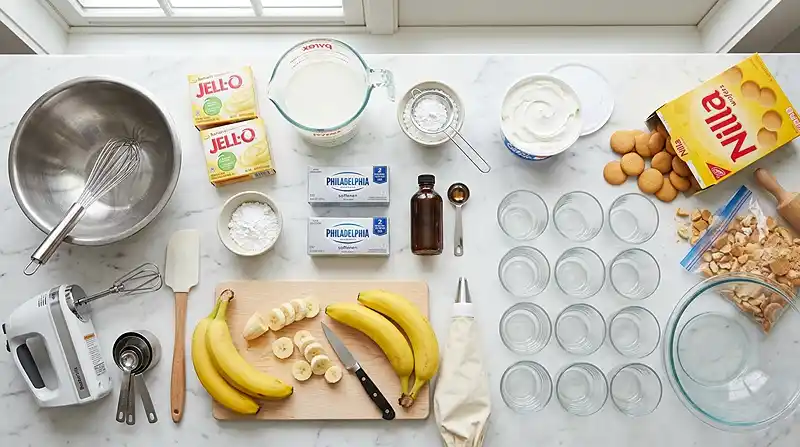
| Ingredient Group | Ingredient | Amount | Notes |
|---|---|---|---|
| Pudding Layer | Instant banana pudding mix | 2 (3.4 oz) packages | Vanilla or favorite flavor works |
| Pudding Layer | Cold milk | 4 cups | Must be cold for proper set |
| Cheesecake Layer | Cream cheese, softened | 1 (8 oz) brick | Fully softened — no shortcuts |
| Cheesecake Layer | Powdered sugar | 1/3 cup | |
| Cheesecake Layer | Vanilla extract | 1 teaspoon | |
| Cheesecake Layer | Whipped topping, thawed | 1 (12 oz) tub | 16 oz leaves extra for garnish |
| Cookie & Fruit Layers | Vanilla wafer cookies | 1 (15 oz) box, divided | Split between layers |
| Cookie & Fruit Layers | Large bananas | 4 to 6 | Sliced just before serving |
| Garnish | Vanilla wafer cookies | As needed | Crushed or whole |
| Garnish | Banana slices | As needed | Added at the very last minute |
The cream cheese is what separates this from a basic pudding cup — it adds richness and body that makes the whole dessert feel like something you’d order at a restaurant. Make sure it’s genuinely room temperature before you start beating it, or you’ll get lumps no matter how long you mix.
For the cookies, the chunky crush is intentional. You want irregular pieces so some stay slightly crunchy even after chilling — that texture contrast is what makes these easy dessert cups so satisfying compared to fully soggy versions.
How to Make Banana Pudding Cups Step by Step
Make the Pudding Layer
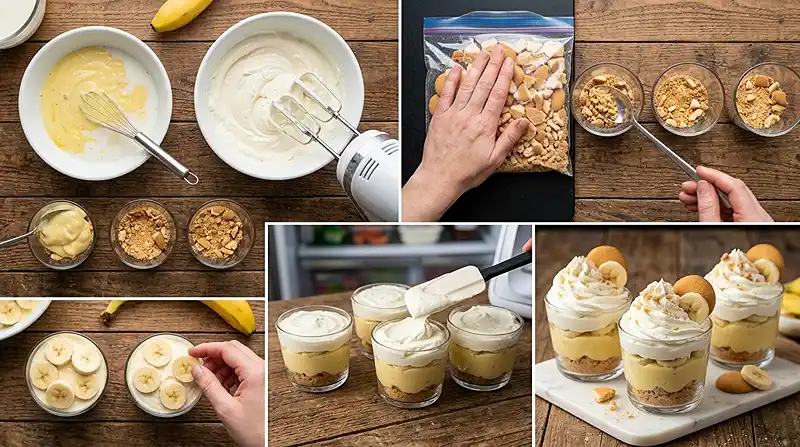
- Whisk the instant banana pudding mix and cold milk together in a medium mixing bowl.
- Cover the bowl and refrigerate until the pudding is fully thickened.
Pro Tip: Cold milk is non-negotiable here — warm or room-temperature milk prevents instant pudding from setting properly and you’ll end up with a runny layer that won’t hold its shape in the cups.
Make the Cheesecake Layer
- Beat the softened cream cheese with the powdered sugar and vanilla extract in a large mixing bowl until completely smooth.
- Add 1 1/2 cups of the whipped topping to the cream cheese mixture and beat until fully blended.
- Set the remaining whipped topping aside for decoration.
Prepare the Bananas
- Peel the bananas and slice into 1/2-inch thick rounds if assembling the trifle or cups immediately. If making cups ahead, wait to slice until just before serving.
Pro Tip: The key to preventing brown banana slices is timing — cut them as late as humanly possible, ideally within 10 minutes of serving.
Assemble the Individual Cups (Makes 20 cups)
- Place 30 vanilla wafer cookies in a resealable bag and crush to a chunky, uneven texture.
- Divide the crushed wafer cookies evenly onto the bottom of each of the 20 individual 9 oz cups.
- Divide the thickened pudding evenly on top of the cookie layer in each cup.
- Crush the remaining 30 cookies in a resealable bag and divide evenly among all cups.
- Add the cream cheese cheesecake layer divided evenly to all cups.
- Cover the cups and refrigerate to allow the cookies to soften — ideally no more than 1 to 2 hours.
- Right before serving, lay 5 to 6 banana slices flat on top of the cheesecake layer in each cup.
- Add a generous dollop or piping of the reserved whipped topping and garnish with a wafer cookie and banana slice. Serve immediately.
Assemble the Large Pan Trifle (9×13 dish)
- Line a 3-quart 9×13-inch glass dish with a single layer of vanilla wafer cookies.
- Pour the prepared banana pudding over the cookies and spread evenly with a spatula.
- Add the banana slices over the pudding layer in an even layer.
- Dollop the cream cheese cheesecake mixture over the bananas and very gently spread with a spatula until the layer is even.
- Top the cheesecake layer with an even layer of vanilla wafer cookies.
- Right before serving, scoop the reserved whipped topping into a small resealable bag and cut off one corner to create a piping bag.
- Decorate the top with whipped topping, banana slices, and crushed or whole cookies as desired. Serve immediately.
Pro Tip: For best results when making ahead, complete all layers except the banana slices and final whipped topping garnish, then refrigerate for up to 2 hours. Add both right before the cups hit the table.
Expert Tips for Perfect No-Bake Banana Pudding Cups
Pro Tips for Success
The key to a clean, layered cup is making sure your pudding is fully set before you start building. If it’s still loose when you layer it, everything slides and you lose that beautiful definition between layers. Give it at least 20 to 30 minutes in the fridge before assembling.
The most common mistake is using cold cream cheese — instead, pull it out at least 45 minutes before you start. Lukewarm cream cheese beats smooth and fluffy in under two minutes. Cold cream cheese fights you the whole way and leaves lumps no matter what.
For best results with the cookie crumble, aim for irregular chunks rather than fine crumbs. You want some pieces the size of a pea and some smaller — that uneven texture means some stay slightly crunchy even after the refrigeration period, which makes these no-bake desserts genuinely interesting to eat.
No-Bake Banana Pudding Cups work best when the bananas are just ripe — yellow with a few spots, not fully brown. Overripe bananas are sweeter but go mushy fast once sliced, and the texture suffers. Slightly firm bananas hold their shape beautifully on top of the cups.
Real talk: the 1 to 2 hour refrigeration window is not optional if you want cookie softening. Less than that and the bottom layer stays too crunchy. More than that and it goes completely soft. Set a timer and pull them out right on schedule.
Delicious Variations
Chocolate Version: Swap the banana pudding for chocolate instant pudding and use chocolate sandwich cookies in place of vanilla wafers. The cream cheese layer stays exactly the same and pairs surprisingly well with the chocolate base.
Gluten-Free Version: Replace the vanilla wafer cookies with your favorite gluten-free vanilla cookies or gluten-free graham crackers crushed to the same chunky texture. Double-check your instant pudding mix label as well, since some brands use additives that contain gluten.
Low-Sugar Version: Use sugar-free instant pudding and reduce the powdered sugar in the cream cheese layer to 2 tablespoons. The cream cheese and whipped topping carry enough sweetness that you won’t miss it, and it cuts the overall sugar load significantly for a lighter warm-weather treat.
Troubleshooting Common Problems
Problem: The pudding layer is runny and won’t hold its shape.
Solution: Your milk wasn’t cold enough, or the pudding didn’t refrigerate long enough. Give it a full 30 minutes minimum. If it’s still loose, it won’t firm up further — start fresh with cold milk straight from the fridge.
Problem: The cream cheese layer has lumps.
Solution: The cream cheese wasn’t fully softened. You can try beating longer on high speed, but lumps from cold cream cheese rarely smooth out completely. Next time, leave it at room temperature for a full 45 to 60 minutes before mixing.
Problem: The banana slices turned brown before serving.
Solution: They were sliced too early. Cut them no more than 10 to 15 minutes before the cups go out. There’s no reliable fix once browning starts — it’s a timing issue, not a technique issue.
How to Store and Reheat No-Bake Banana Pudding Cups
| Storage Method | Duration | Best Practice |
|---|---|---|
| Room Temperature | Up to 2 hours | Keep covered; don’t leave out longer if banana slices are on top |
| Refrigerator (without banana) | Up to 2 days best / 4 days max | Cover tightly with plastic wrap; add banana slices at serving time only |
| Refrigerator (with banana) | Same day only | Cover tightly; expect some browning on banana edges |
| Freezer | Not recommended | Bananas and whipped topping don’t freeze well; texture suffers significantly |
These cups are served cold straight from the fridge — no reheating needed or wanted. If they’ve been refrigerated overnight, pull them out about 5 minutes before serving so the cream cheese layer loses that slight fridge-firm edge and softens back to its creamy texture.
Leftover cups (without banana) work great the next day as a quick afternoon treat or a packed lunch dessert. You can also scoop the layers out of leftover cups and serve over fresh-baked berry cobbler muffins for a completely different dessert situation that uses up every last bit.
FAQs About No-Bake Banana Pudding Cups
Can I make No-Bake Banana Pudding Cups ahead of time?
Yes — this is one of the best make-ahead sweets for parties precisely because most of the work can be done up to 2 hours in advance. Assemble all layers except the banana slices and final whipped topping garnish, cover tightly, and refrigerate. Add both right before serving. The assembled cups without banana will technically keep for up to 4 days in the fridge, though freshness peaks on days 1 and 2.
Can I use a different pudding flavor?
Absolutely. Vanilla pudding is the most classic swap and works seamlessly with all the other layers. Cheesecake-flavored instant pudding is another popular option that leans into the cream cheese layer. Any flavor of instant pudding that pairs well with banana and vanilla wafers will work — the structure of the recipe stays the same regardless of flavor.
How do I keep the banana slices from turning brown?
Timing is the only real solution. Slice the bananas no more than 10 to 15 minutes before the cups go out to guests. The lemon juice trick works in some recipes, but it changes the flavor profile here in a way that doesn’t complement the pudding and cream cheese. Just cut them late and serve promptly.
Is this recipe gluten-free?
Not as written, since vanilla wafer cookies contain gluten. However, it’s easy to adapt — swap in your preferred gluten-free vanilla cookies or crushed gluten-free graham crackers at the same quantities. Also check the label on your instant pudding mix, as some brands include additives with trace gluten. The pudding, cream cheese, whipped topping, and bananas are all naturally gluten-free.
What size cups work best for individual servings?
9 oz clear plastic cups are the standard for this recipe and the size this recipe is written for — they show off the layers beautifully and hold a generous single serving. You can use 5 oz cups for smaller party portions and simply adjust the layering amounts accordingly, which will increase your yield. Mason jars also work well if you want a more rustic, reusable presentation for a dinner party or backyard gathering.
Ready to Make These This Weekend?
Honestly, once you make these for a party, people will ask for them every single time. They look like you spent hours, and the whole thing comes together in under 30 minutes of active work. I mean it — this is one of those recipes that just makes you look good.
Save this to Pinterest so it’s there when you need it next. And if you make them, drop a comment below — I’d love to know which pudding flavor you went with and whether you did cups or the big trifle pan.
If you’re on a no-bake roll, check out these buffalo chicken celery boats for a savory party bite to go alongside, or wind things down with a glass of homemade ginger pineapple tea — it’s a perfect warm-weather pairing.
No-Bake Banana Pudding Cups — creamy pudding, fluffy cream cheese filling, crunchy vanilla wafer crumble, and fresh banana in every layer. Zero baking, 20 individual cups, pure crowd-pleaser. Save this for your next summer party or easy make-ahead dessert day.
No-Bake Banana Pudding Cups
Equipment
- Medium Mixing Bowl
- Large mixing bowl
- Hand mixer or stand mixer
- Whisk
- Spatula
- Resealable plastic bags
- 20 individual 9 oz serving cups
- 3-quart 9×13 inch glass dish (for trifle version)
- Small piping bag or resealable bag
Ingredients
Pudding Layer
- 2 3.4-ounce packages instant banana pudding Vanilla or favorite flavor works too
- 4 cups Cold milk
Cheesecake Layer
- 8 oz Cream cheese Softened
- 0.33 cup Powdered sugar
- 1 tsp Vanilla extract
- 12 oz Whipped topping Thawed; 16 oz tub leaves some for garnish
Cookie & Fruit Layers
- 15 oz Vanilla wafer cookies Divided; box amount
- 4 Large bananas Up to 6; sliced just before serving
Garnish
- Vanilla wafer cookies Crushed or whole
- Banana slices Added right before serving
Instructions
- Make the Pudding Layer
In a medium mixing bowl, whisk together the instant banana pudding mix and cold milk. Cover and refrigerate until thickened. - Make the Cheesecake Layer
In a large mixing bowl, beat the softened cream cheese with the powdered sugar and vanilla extract until smooth and creamy. Add 1½ cups of the whipped topping and beat until fully blended. Reserve the remaining whipped topping for decoration and set aside. - Slice the Bananas
Peel the bananas and slice into ½-inch thick rounds if assembling the trifle or individual cups right away. If making cups ahead, wait to cut the bananas until just before serving to prevent browning. - Individual Cups — Crush the First Cookie Layer
Place 30 vanilla wafer cookies in a resealable bag and crush to a chunky, uneven texture. Divide the crushed cookies evenly onto the bottom of each of the 20 individual 9 oz cups. - Individual Cups — Add the Pudding Layer
Evenly divide the prepared banana pudding on top of the cookie layer in each cup. - Individual Cups — Add the Second Cookie Layer
Crush the remaining 30 cookies in a resealable bag and divide them evenly among all cups, spreading over the pudding layer. - Individual Cups — Add the Cheesecake Layer
Divide the cream cheese whipped topping mixture evenly among all cups. Cover and refrigerate to allow the cookies to soften — ideally no more than 1 to 2 hours. - Individual Cups — Garnish and Serve
Right before serving, lay 5 to 6 banana slices flat on top of the cheesecake layer in each cup. Add a generous dollop or piping of the reserved whipped topping and garnish with a wafer cookie and a banana slice, if desired. Serve immediately. - Large Pan Trifle — Build the Base
Line a 3-quart 9×13-inch glass dish with a single layer of vanilla wafer cookies. Pour the prepared banana pudding over the cookies and gently spread evenly with a spatula. - Large Pan Trifle — Add the Banana Layer
Arrange the banana slices over the pudding layer in an even layer. - Large Pan Trifle — Spread the Cheesecake Layer
Dollop the cream cheese whipped topping mixture over the bananas. Use a spatula to very gently spread until the dollops meet and the cheesecake layer is evenly distributed over all the bananas. - Large Pan Trifle — Top with Cookies
Top the cheesecake layer with an even layer of vanilla wafer cookies. - Large Pan Trifle — Decorate and Serve
Right before serving, scoop the reserved whipped topping into a small resealable bag and cut off one corner to create a piping bag. Decorate the top with whipped topping, banana slices, and crushed or whole cookies as desired. Serve immediately.